As web developer, we want to have separate development server which is always "ON" that we can use to test the functionality of our web codes or check our design layout on your actual different devices (desktop, tablet, mobile phone, etc.). Some prefer to use web hosting service and pay monthly or annually and others setup local machine at their home. I prefer the latter.
This local machine as being turned on - 24/7, needs to consume low power. I have bought Synology DS412+ for my backup storage of my files, media entertainment centralized server and torrent station. Good thing is that it can also be used as web server which is perfect for local development environment as it is low power and it sleeps whenever there are no network activities accessing this small server.
This tutorial will walk you through steps to setup Synology Diskstation's web server, internal DNS for development (to define own internal DNS rules purposes) and register your development site clean URL. In the following steps, Windows platform is used and 192.168.1.3 is the Synology Diskstation's IP address.
Setup web server
Setting-up web server is straightforward.
- Open your favorite web browser and go to http://diskstation:5000/webman/index.cgi
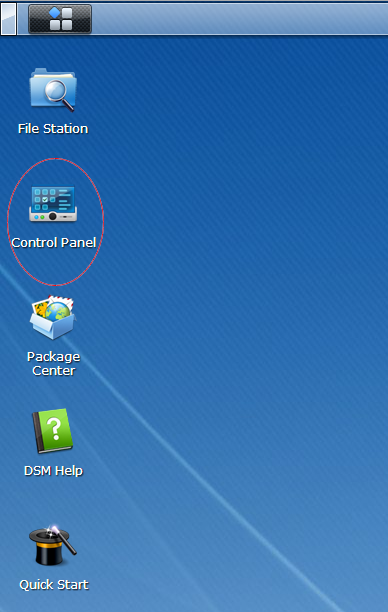
- Open Control Panel:
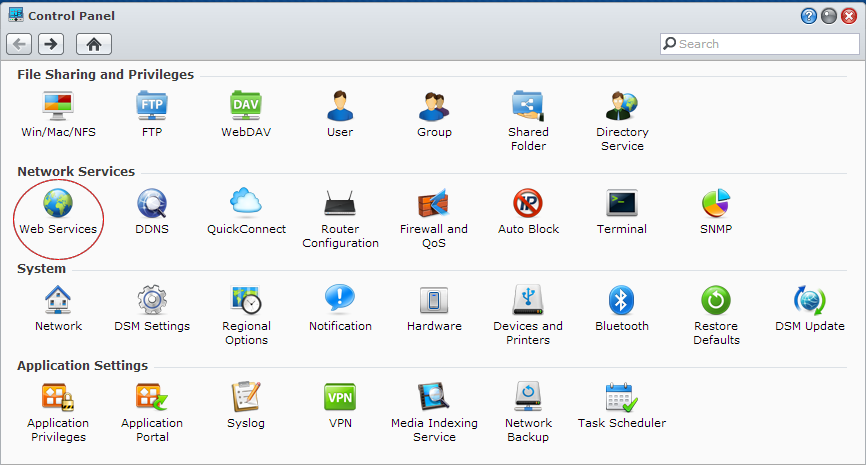
- Click Web Services:
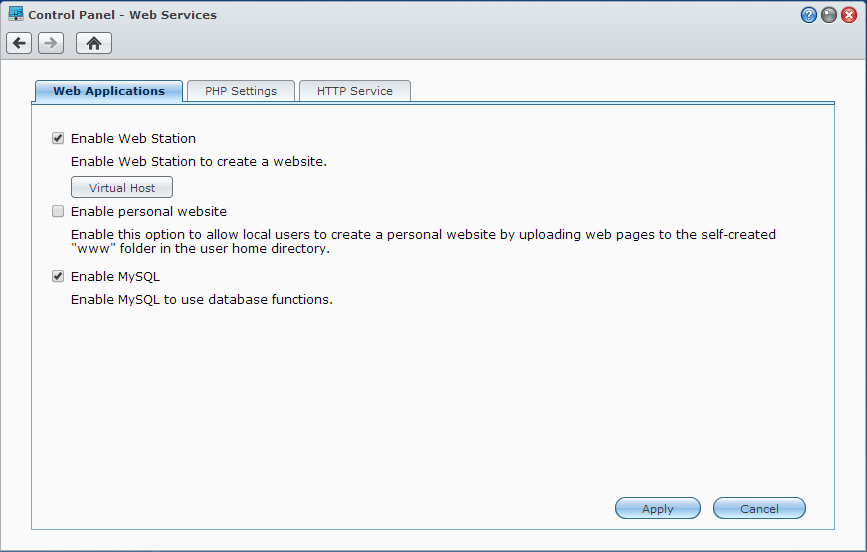
- Check/tick the checkbox options "Enable Web Station" and this is optional "Enable MySQL" (if your site is using database) and cllick the "Virtual Host" button:
- Click "Create" button and enter your "Sub-folder Name" and "Hostname". In this example, we will use "drupal" and "drupal.dev" under "Sub-folder Name" and "Hostname" columns respectively. Click "OK" button.
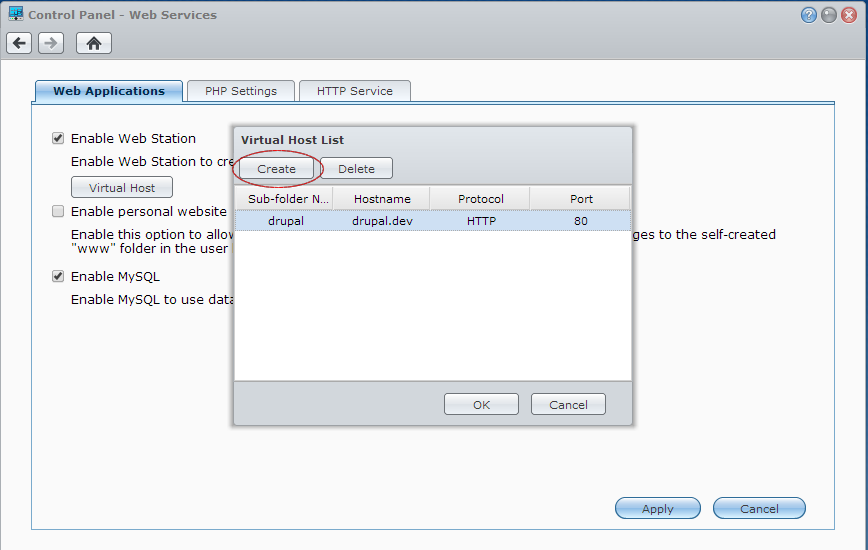
The "drupal" sub-folder will be created automatically. The Synology DiskStation provides the default shared folder called "web". You can store your web files in this folder. Since we have created "drupal" sub-folder, the \\192.168.1.3\web\drupal is now exist. Later, we will use this “drupal.dev” in the next steps.
This "drupal.dev" is not yet accessible to our computer's web browser, we will need to register this "drupal.dev" to Synology's DNS server. Why do we need a DNS server? Example we have two development sites:
drupal.dev
panopoly.dev
These are two development sites but on one web server (Synology DiskStation running Web Station), but they virtually exist as two separate sites. We say that these are our setting in Virtual Server:
| Folder name | Hostname | Protocol | Port |
|---|---|---|---|
| \\192.168.1.3\web\drupal | drupal.dev | HTTP | 80 |
| \\192.168.1.3\web\panopoly | panopoly.dev | HTTP | 80 |
We can see that they are actually two subfolders in our single web server but they can be accessed in two different hostname/URL. User might think that they are on two different server but in reality they are hosted on same web server.
Of course, we can always access these development sites via http://192.168.1.3/site_folder_name. Now, they will be recognized to be on the same server (192.168.1.3). The host might not want their users to know this that is why there is the feature for virtual hosts. What do we need if we want to use this virtual host? Follow the steps mentioned above and DNS server is needed to register the records.
In this case, we only use it in internal. We will need to have the records for our local computer/devices to find our Synology DiskStation. We have to tell the computers (not the users) that drupal.dev is located at 192.168.1.3 and panopoly.dev is located at 192.168.1.3 as well.
When the user access "drupal.dev" or "panopoly.dev", the computer/web browser will ask the DNS server what IP is needed to reach this site and the it will know that it is at 192.168.1.3 and web browser will send the HTTP request for "drupal.dev" or "panopoly.dev" web page. Then web server will pass the requested data according to the http header. That is why one web server can handle multiple virtual hosts.
Install DNS Server
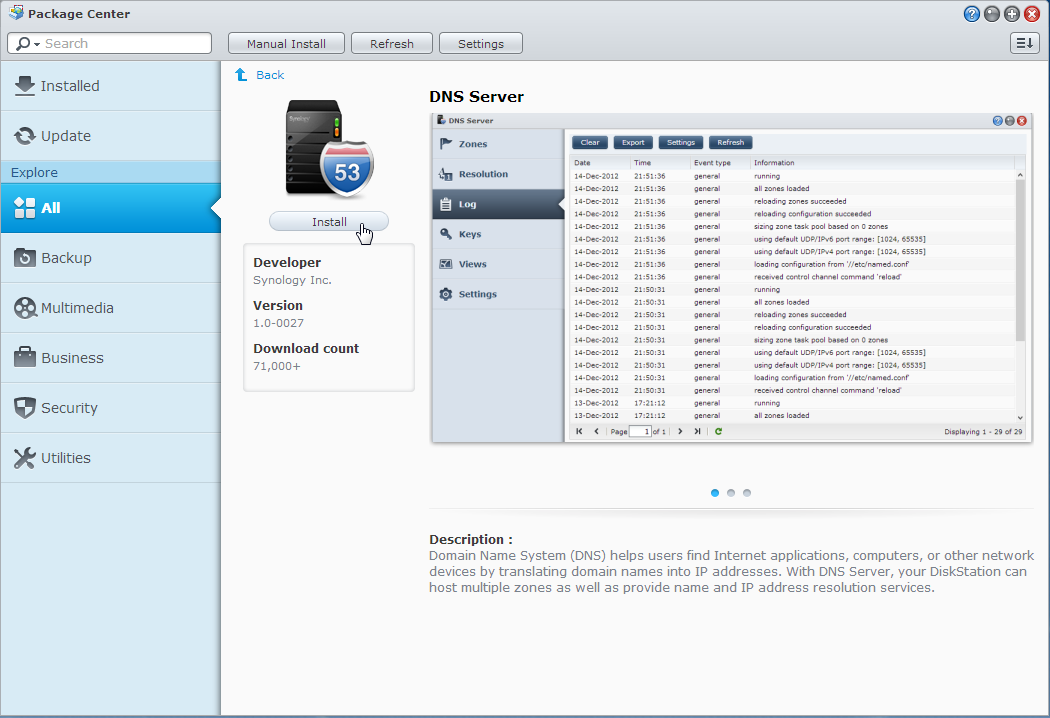
Synology has something called Package Center, it’s like an App store or Google play where you can select software that can be installed in your Synology.
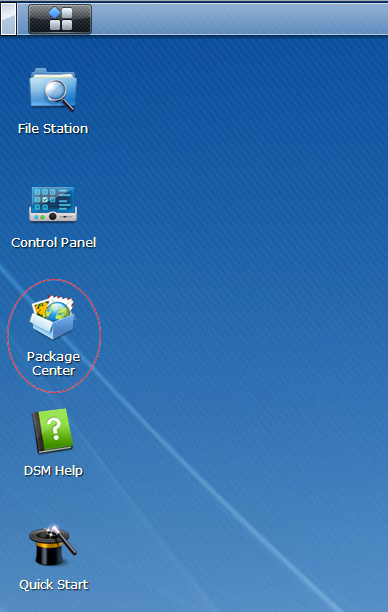
- Open Package center:
- Install DNS Server:
Register your development site URL
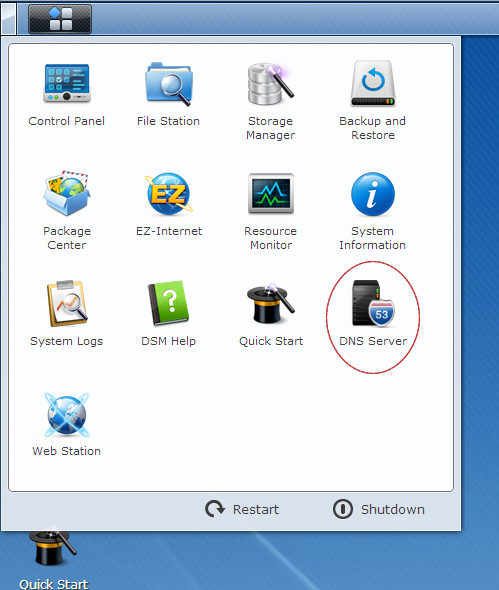
- Open "DNS Server":
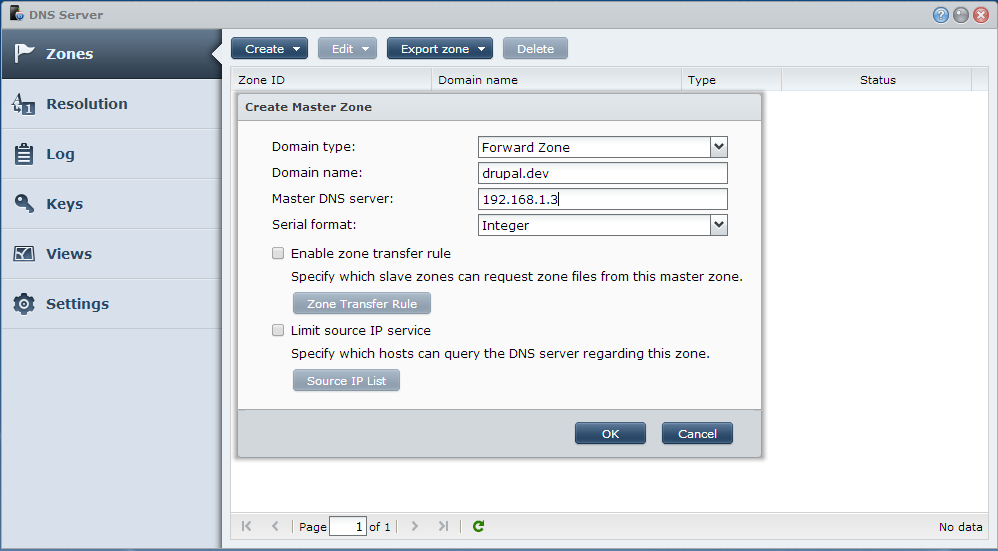
- Click "Zone" > "Create" > "Master Zone":
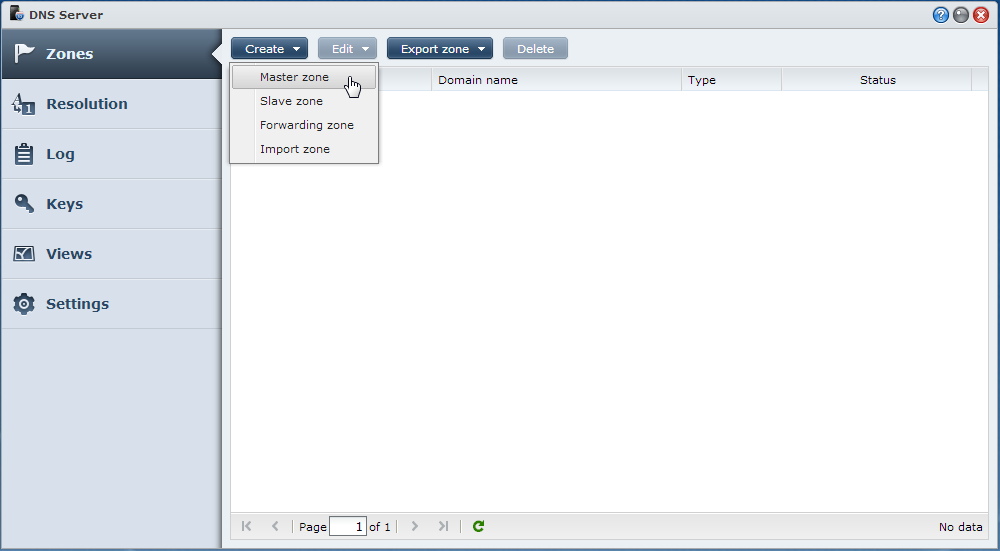
- Enter the Hostname URL value from "Web Services" > "Vitual Host". In our example, enter "drupal.dev". The "master" DNS server is the IP address of your Synology DiskStation (in my case, I am using 192.168.1.3). Click "OK" button:
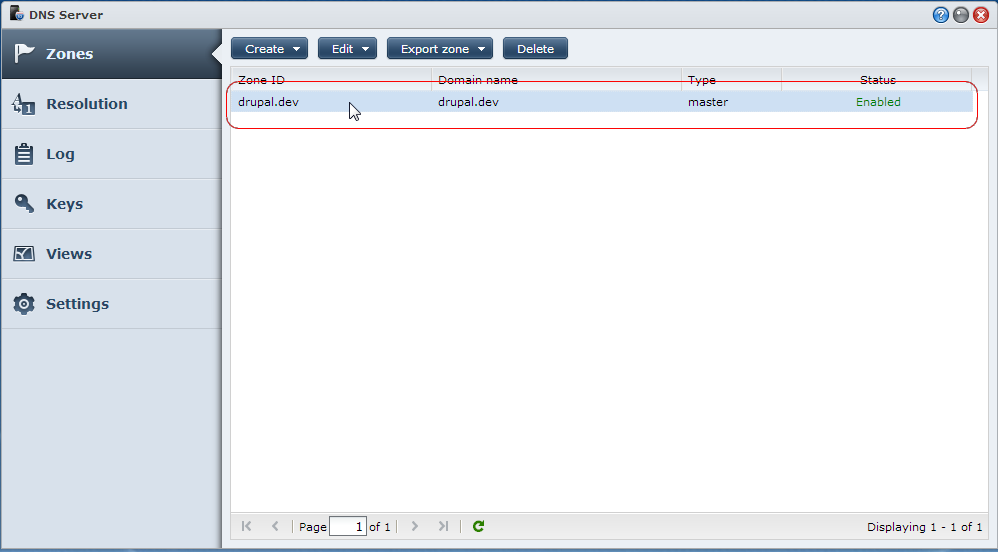
- Each zone must have a NS record that points to name server, each address that can be used have one "A record" that maps the IP. We will need to create the "A record". Select the created Zone:
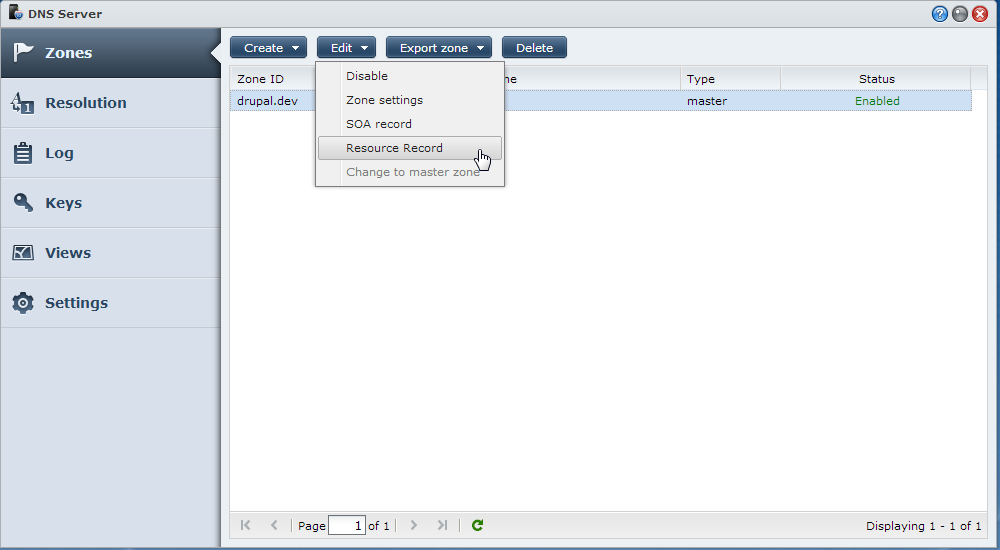
- Click "Zone" > "Edit" > "Resource Record":
- Click "Create" > "A Type":
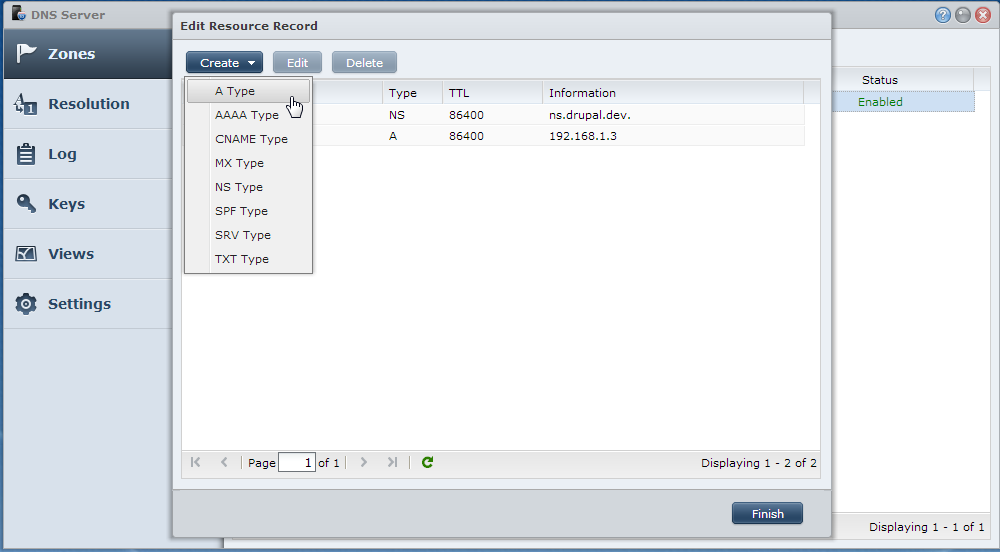
- Leave the "Name" blank (already shows as "drupal.dev") and enter the IP address of your Synology DiskStation (in my case, I am using 192.168.1.3):
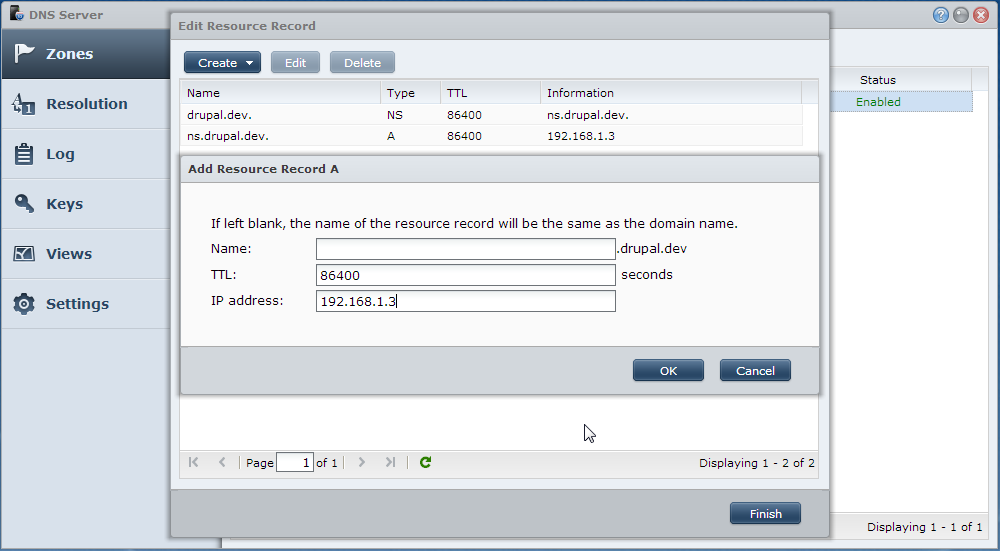
- Click "OK" button then "Finish" button.
Currently, if we will use our newly created DNS server, only our custom domain for development (which in our case "drupal.dev") will be resolved by Synology DiskStation but the public domains such as google.com, yahoo.com, etc. are not.
We have two options:
Option 1. Synology DiskStation as the only DNS server on your internal network (caveat: Synology DiskStation should always be "ON" to be able your clients properly browse the internet).
Option 2. Synology DiskStation as optional DNS server on your internal network (caveat: need to configure each of your client PC’s DNS server settings).
Local DNS setup Option 1 steps:
- Open "DNS Server":
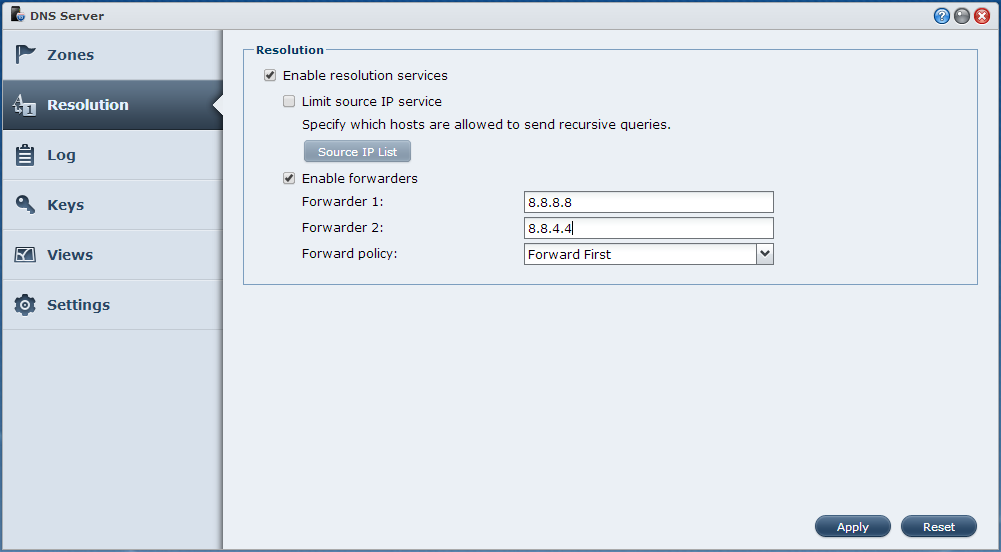
- Click "Resolution" and check/tick the "Enable resolution services" and "Enable forwarders" checkboxes then enter the IP addresses of the public DNS server such as OpenDNS, Google Public DNS, etc. of your choice (in this example, we will use Google public DNS IP addresses: 8.8.8.8 and 8.8.4.4) under "Forwarder 1" and "Forwarder 2" fields. Click "Apply" button:
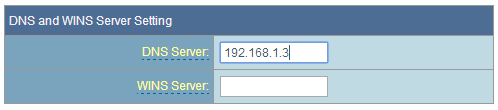
- Go to your router's admin DNS Server settings and populate the DNS Server field with IP address of your Synology DiskStation (in my case, I am using 192.168.1.3). Below is the my wifi router's DNS Server field:
Local DNS setup Option 2 steps:
- Open "DNS Server":
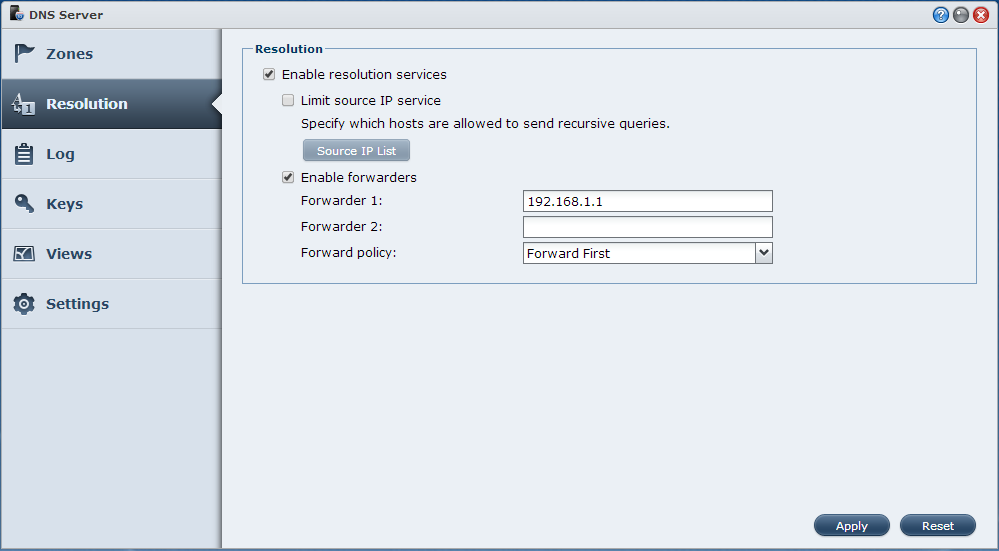
- Click "Resolution" and check/tick the “Enable resolution services” and "Enable forwarders" checkboxes then enter the IP address of your router (in my case, the IP address of my wifi router is 192.168.1.1) under "Forwarder 1" field. Click "Apply" button:
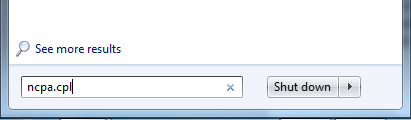
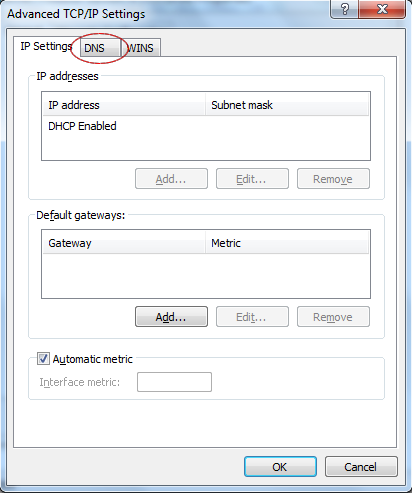
- Configure each of your client's DNS server settings. Windows 7 setup will be shown in this example. In Start menu search box, type "ncpa.cpl" and press "Enter":
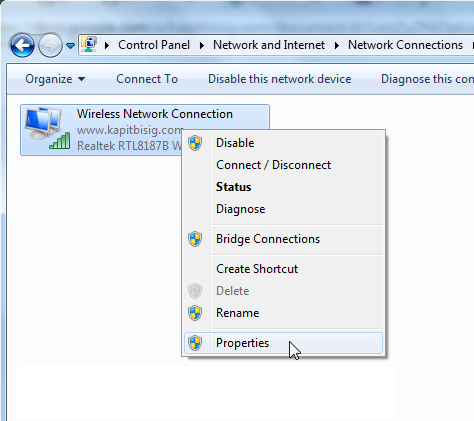
- Window will open. Right click on your Network Connection and select "Properties":
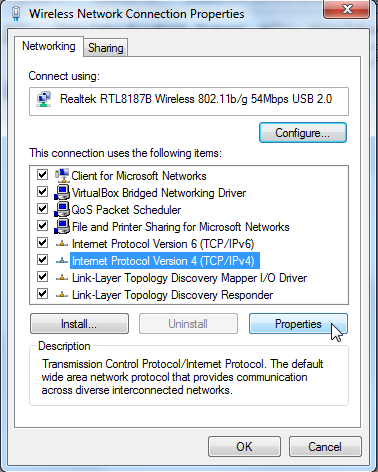
- A small window will open. Select "Internet Protocol Version 4 (TCP/IPv4)" and click the "Properties" button:
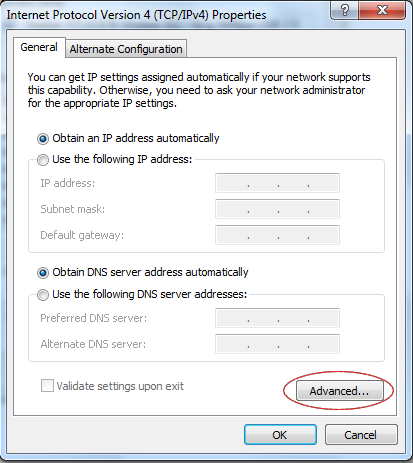
- Another small window will open. Click "Advanced…" button:
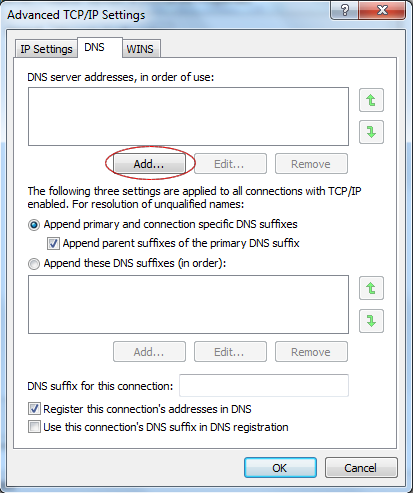
- Another small window will open. Click the "DNS" tab:
- Click "Add.." button:
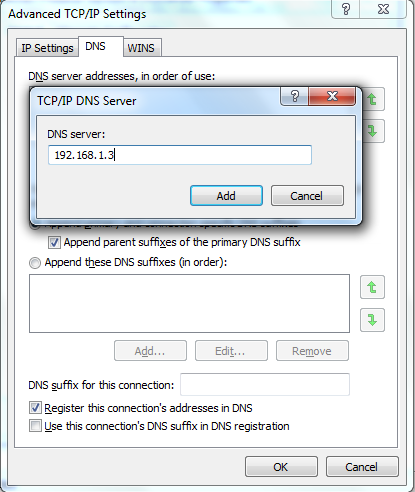
- Enter the IP address of your Synology DiskStation (in my case, I am using 192.168.1.3) and click "Add" button:
- Next enter the IP address of your router, click the "Add…" button again and enter the IP address (in my case, the IP address of my wifi router is 192.168.1.1) then click "Add" button:
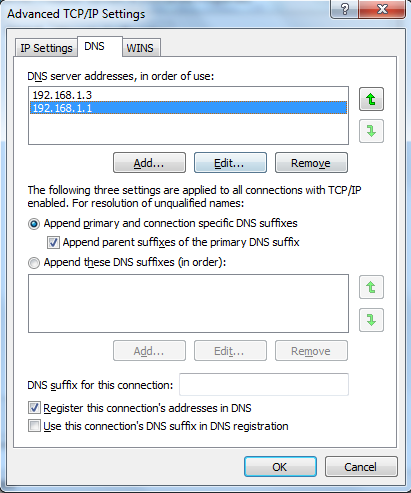
- Close all the windows by clicking each window’s "OK" button.
Testing
-
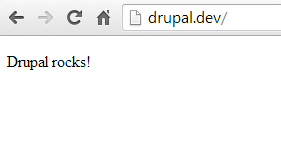
Create an HTML file with filename of "index.html". Copy and paste the following codes inside this file:
<!DOCTYPE html PUBLIC "-//W3C//DTD HTML 4.01//EN"
"http://www.w3.org/TR/html4/strict.dtd">
<html>
<head>
<title>Drupal</title>
</head>
<body>
<p>Drupal rocks!</p>
</body>
</html>
... and save this file at \\192.168.1.3\web\drupal.
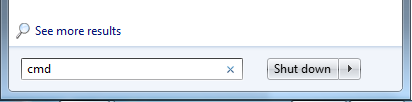
- The client PC needs to renew its network to recognize the new DNS server at Synology DiskStation. Windows 7 client will be shown in this example. In Start menu search box, type "cmd" and press "Enter":
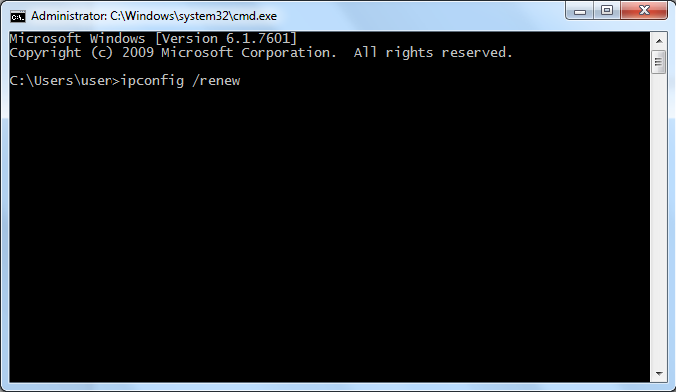
- Type "ipconfig /renew" and press "Enter":
- Open your favorite web browser and enter at address bar "htttp://drupal.dev" and we should see:
Note: If you can't get the local domains to work, try to restart your web server. Login as admin via a terminal session on your Synology NAS and execute the following:
If you are using Apache:sudo restart pkg-apache22sudo synoservicecfg --restart nginx
Comments
arpeggio
Tue, 02/16/2016 - 09:34
In reply to What about setting up the panoply.dev url? by Anonymous (not verified)
Everything exactly the same as drupal.dev URL
Everything exactly the same as drupal.dev URL. Just follow how the drupal.dev URL created.
Hi…
Hi
Its Very informative article. I can understand Setup Synology as local development environment. Great Post. Thanks for sharing this blog.
Beat Regards
Adam
External??
Hey
I have a Nas with this Domain: MyNasDomain.com
Now I want to Host a website with this Domain: MyWebsiteDomain.com.
How do I make it so MyWebsiteDomain.com isnt associated with MyNasDomain.com. I'm really confused on what to do..
Best Regards
David
Hi David,…
Hi David,
Please follow steps 1 to 8 under "Register your development site URL" of the article above. Just replace the drupal.dev with MyWebsiteDomain.com and 192.168.1.3 with whatever the IP address of your Synology DiskStation.
Thanks,
Roland
Can't seem to get the local…
Can't seem to get the local domains to work...
Open your favorite web browser and enter at address bar "htttp://drupal.dev" and we should see:
The instrunctions above were…
The instrunctions above were tested working. Make sure you have followed one of the following 2 options mentioned above:
Local DNS setup Option 1 steps
Local DNS setup Option 2 steps
Rich (not verified)
Fri, 02/17/2017 - 01:07
In reply to Can't seem to get the local… by Ariaan (not verified)
Can't seem to get the local...
I experienced the same issue - everything was set up as the tutorial explained - but the local domain (myname.dev) did not resolve to the sub-folder where the files resided. After considerable experimentation, I finally stopped the Apache Web Server and restarted it. After that, the domain resolved to the correct sub-folder, and the vitual host worked as expected. My suspicion is that the Apache Web Server restart caused the virtual host configuration file (httpd-vhost.conf) to be updated with the new domain details.
Thank you for sharing your…
Thank you for sharing your solution.
Can it be viewed by public
Hi i have a doubt, if we host our website through synology, can public able to access my website?.
Yes you can make your…
Yes you can make your Synology host your website open to public but the guide above is only for website used as local development environment purposes. In my experience, I suggest not to use your Synology to host your website if it is high traffic as it has very limited system resources. You should host your site to a server that has decent system resources, I suggest this web hosting provider.
Dishevel (not verified)
Sat, 01/09/2021 - 11:52
In reply to Can it be viewed by public by vignesh (not verified)
Web hosting public
if you domain name is for example mydomain.com in your nas you can add www.mydomain.com add DDNS and then your website will be open for public
Local access only
Hello Arpeggio,
This is fantastic tutorial, thank you very much.
I'm just about to set up internal page, for our employees and I can't find a solution to make this local website (Wordpress based) available only for Synology users. So when one of our employees goes to http://ourlocaldomain.com, they will be asked to log-in with Synology credentials.
Is this possible?
Thanks
"Directory Server" Synology app
Hello Rafal,
You're welcome. I am not sure if "Directory Server" Synology app will satisfy your requirement but you can always start/experiment on that Synology app. Good luck.
Question
I want to thank you for adding this tutorial, it looks like it will help alot. I some questions that perhaps you can help me with, so I understand this better. 1) This is for displaying web pages locally only, as in like a testing server? Will visitors still be able to view the site on the internet using this method or do I need to implement a different one to accomplish this? Buy changing the DNS router or windows settings will this block other computers from accessing the internet? Please advise as I am new to using the Synology 216++ and I am having a hard time setting up my sites. If you can help this would be brilliant.
You're welcome…
You're welcome.
Q: This is for displaying web pages locally only, as in like a testing server?
A: Yes.
Q: Will visitors still be able to view the site on the internet using this method or do I need to implement a different one to accomplish this?
A: No the visitors outside your network will not be able to access the website. In our tutorial above, it is expected that the domain you will use is not registered in any domain name providers. That is why there's step above to create your own DNS in your local network so that your computer can browse the made up domain. The tutorial presented above is not for hosting a website that is accessible outside your network. Thus, you will need different tutorial to accomplish your need. In my experience, it is not recommended to use your Synology to host your website (specially if it is high traffic) as your NAS has very limited system resources and the performance of other applications of your Synology might be affected. You should host your website to a server that has decent system resources that can handle properly the needs of your website, I suggest this web hosting provider.
Q: Buy changing the DNS router or windows settings will this block other computers from accessing the internet?
A: No. The tutorial above should not prevent computers in your network to access the internet.
Wordpress
Very useful guide. I followed it and it works! But I also have wordpress installed on my nas that dont work :(
Wordpress on my synology: web/wordpress
My WP site: kinh
What wrong?
Kim
Try not to use the Synology…
Try not to use the Synology's Wordpress plugin in Package Center. Instead, download it at https://wordpress.org/download and extract it at your sub-folder that was auto created from step 5. This way, you should now successfully access and setup your Wordpress site as you have said you have successfully followed the guide.
It does work
Well it does work because i had to enable PHP cache. Thats it's.
However both this guide on this page and my wordpress installation it is only the homepage that show the domain name. The sub-pages show ip adress! Does the same apply for others? And how do we fix it so it behaive like a normal domain name????
I don't experience the issue…
I don't experience the issue that sub-pages show IP address. It must be in Wordpress' configuration. I'm sorry, I don't know much in Wordpress as I am not a Wordpress developer. Start looking at its .htaccess file or its configuration pages/files (if there are any).
Very Helpful Tutorial!! Thanks!!
Thanks for the very informative tutorial on setting up a DNS server and using the Web Station to its fullest potential! Thanks man! Thumbs up to you.
arpeggio
Tue, 02/25/2020 - 12:51
In reply to Very Helpful Tutorial!! Thanks!! by Donald (not verified)
You're welcome. I am glad…
You're welcome. I am glad the article helped.
Very Helpful. Better than any other Article
If i saw this article, i would save a 3 days. Many Synology setup article assumes that there is a public IP. This makes it meaningless to use an internal DNS.
Thank you.
Thank you.
Helpful tip
Helpful tip
What about setting up the panoply.dev url?
I hope you'll be able to reply to this. I found your article on setting up Synology very, very helpful. But I was a little disappointed that you didn't go further and then show how you managed to setup the panoply.dev site. Do you have to add a new Master Record in the DNS server?