As of this writing, the latest version of Solr is 5.5.5. In this step by step guide we will install that version and integrate it with Drupal 7 Panopoly distro site using Search API module. Actually, Panopoly distro is already shipped with Search API and Search API Solr Search modules. All we need to do is to configure the pre-setup Search API Solr server and index. The good thing about using Search API is that it is already integrated with Views module and we can do unlimited customization with our search results.
The Solr version 5.x is now a stand alone server, it already comes with Java web server. If we look at Solr version 4.x and below, they need to install Tomcat or Jetty in order to run as a server. Our installation in version 5.x will be much easy. The following instructions are tested running on my Linode server running Centos 7 64-bit Linux distro.
Install Java
Solr is a Java application and in order to run it we need to install Java in our system.
- First we check out if Java is already installed in our machine by issuing the following command:
which java - If Java is not installed, check the available versions of Java and install it:
yum list available java* yum install java-1.8.0-openjdk.x86_64 - Then verify if it is already installed:
which java
java -version
Seup Solr server
- Solr require system user named "solr" and we will create one:
adduser solr - Download and setup Solr server:
cd /opt curl -O http://www.trieuvan.com/apache/lucene/solr/5.5.5/solr-5.5.5.tgz tar zxvf solr-5.5.5.tgz cp /opt/solr-5.5.5/bin/install_solr_service.sh . rm -rf solr-5.5.5 ./install_solr_service.sh solr-5.5.5.tgz - Make the Solr server auto-run when the machine reboot or shutdown:
chkconfig --add solr
chkconfig | grep solr
Create Solr core:
Solr core is a running Lucene index instance with the Solr configuration. It is ideal to create one for each Drupal site (if you are running multi-site).
- Create Solr core instance named "webfoobar":
cd /opt/solr/bin sudo ./solr create -c webfoobar - Change ownership to "solr" user:
sudo chown -R solr:solr /var/solr/ - If you get this error:
"Failed to create core 'webfoobar' due to: Error CREATEing SolrCore 'webfoobar': Unable to create core [webfoobar] Caused by: /var/solr/data/webfoobar/data"
Issue this command again:
sudo ./solr create -c webfoobar - Download search_api_solr module, untar and copy the Drupal specific Solr 5.x core configurations to overwrite the existing configuration files in the created core instance:
curl -O http://ftp.drupal.org/files/projects/search_api_solr-7.x-1.8.tar.gz tar zxvf search_api_solr-7.x-1.8.tar.gz cp search_api_solr/solr-conf/5.x/* /var/solr/data/webfoobar/conf sudo chown -R solr:solr /var/solr/data/webfoobar rm -rf search_api_solr-7.x-1.8.tar.gz search_api_solr - Add your server's IP address to whitelist as well as your personal computer's network IP address (in able to access the Solr admin web interface http://www.mywebsite.com:8983/solr or follow this guide for alternative way of setup). Wrap the item '<New id="Contexts" class="org.eclipse.jetty.server.handler.ContextHandlerCollection"/>' with an IPAccessHandler:
vi /opt/solr/server/etc/jetty.xml... search and replace the '<New id="Contexts" class="org.eclipse.jetty.server.handler.ContextHandlerCollection"/>' with these lines:
<!-- here begins ip securing -->
<New class="org.eclipse.jetty.server.handler.IPAccessHandler">
  <Call name="addWhite">
    <!-- list of args with ip-addresses -->
    <Arg>127.0.0.1</Arg>
  </Call>
  <Call name="addWhite">
    <!-- list of args with ip-addresses -->
    <Arg>xxx.xxx.xxx.xxx</Arg>
  </Call>
  <Set name="handler">
    <New id="Contexts" class="org.eclipse.jetty.server.handler.ContextHandlerCollection"/>
  </Set>
</New>
<!-- end of securing -->
Note: replace the xxx.xxx.xxx.xxx with your personal computer's network IP address
- Start the Solr server:
systemctl start solr.serviceTo create more Solr core instance, just repeat the steps above.
Install Drupal 7 Panopoly
We will use "drush" on the following steps to install Panopoly.
- Download Drupal 7 Panopoly distro to your web directory (in my case its "/home/webfoobar/public_html") and install it:
cd /home/webfoobar/public_html
drush dl panopoly
mv panopoly-7.x-1.23/{.,}* .
rm -rf panopoly-7.x-1.23
drush si panopoly --account-name=admin --account-pass=password --db-url=mysql://admin:password@localhost/mydatabase
Note: Ignore the errors. Those errors will not prevent us from running our Drupal site.
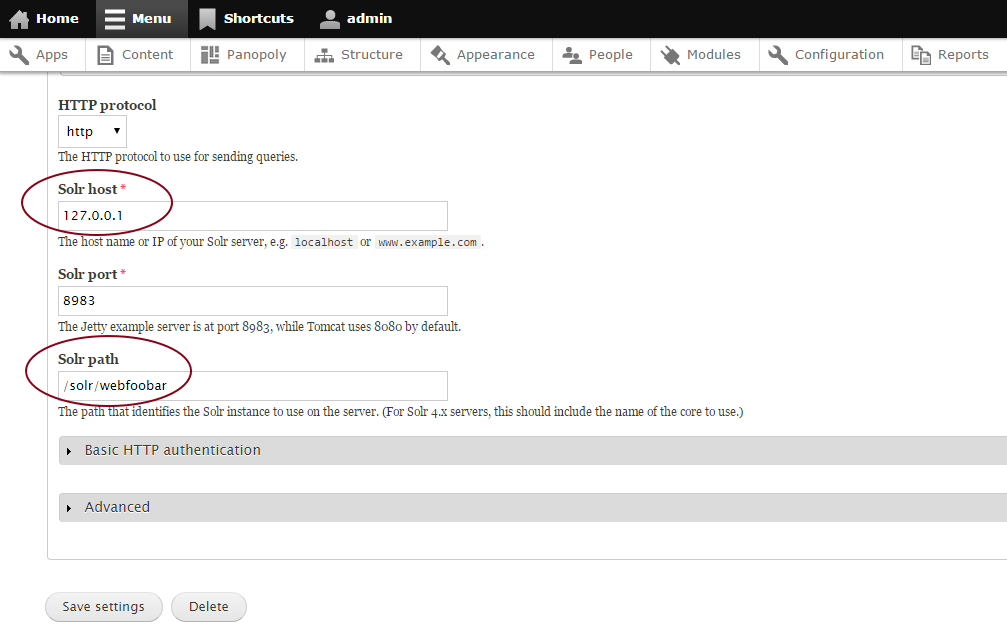
- Login to your newly installed Drupal as admin then go to http://yoursite.com/admin/config/search/search_api/server/solr_server/edit and tick the "Enabled" field, change the "Solr host" field value to 127.0.0.1 and "Solr path" field to /solr/webfoobar (the webfoobar corresponds to the name of the Solr core created earlier) then click "Save settings" button:
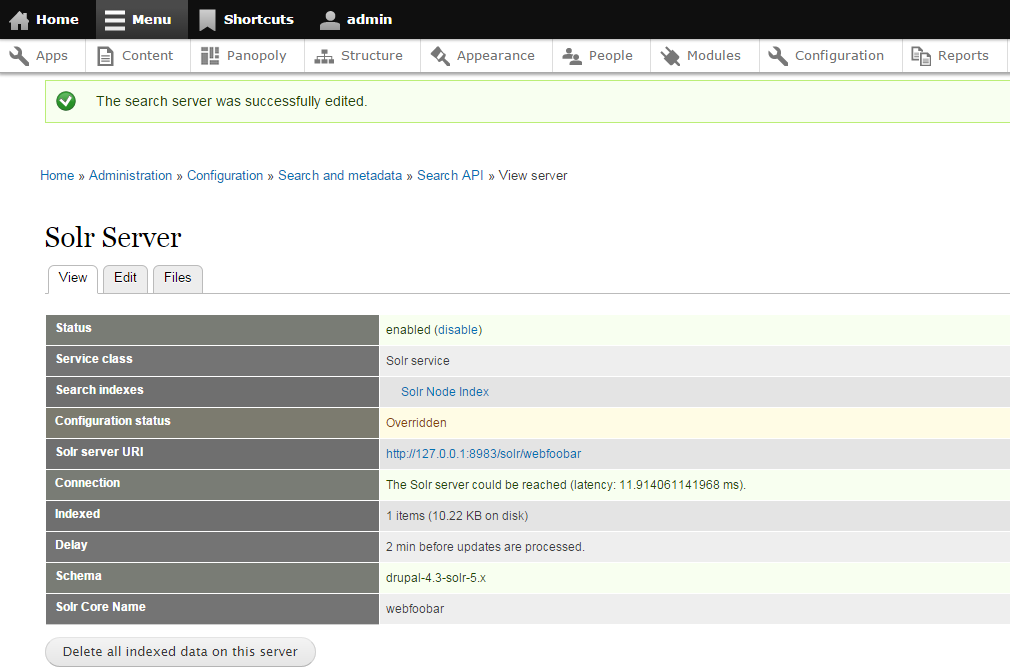
You should see something like this:
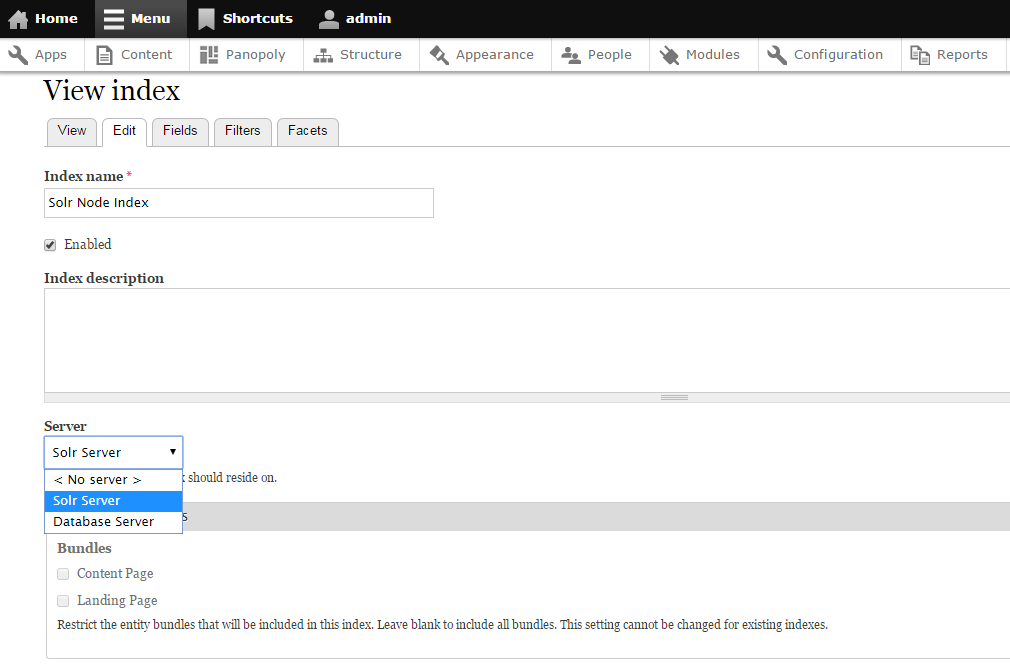
- Lastly, enable the Solr Index by going to http://yoursite.com/admin/config/search/search_api/index/node_index/edit tick the "Enabled" checkbox, select "Solr Server" from the "Server" field and click "Save settings" button:
Congratulations! you have now Drupal 7 Panopoly powered with Solr 5.x.
Comments
Getting the following error:…
Getting the following error:
[root@solr opt]# ./install_solr_service.sh solr-5.2.1.tgz
Extracting solr-5.2.1.tgz to /opt
Creating /etc/init.d/solr script ...
This script requires extracting a WAR file with either the jar or unzip utility, please install these utilities or contact your administrator for assistance.
This script requires extracting a WAR file with either the jar or unzip utility, please install these utilities or contact your administrator for assistance.
arpeggio
Mon, 11/30/2015 - 10:02
In reply to Getting the following error:… by Anonymous (not verified)
Check unzip utility
which unzip
It should output something like this:
/usr/bin/unzip
Otherwise, please install it:
yum install unzip
Thanks for the quick…
Thanks for the quick response! Made it a little bit farther and then more errors:
[root@solr opt]# ./install_solr_service.sh solr-5.3.1.tgz
Extracting solr-5.3.1.tgz to /opt
Creating /etc/init.d/solr script ...
Waiting up to 30 seconds to see Solr running on port 8983 [-] Still not seeing Solr listening on 8983 after 30 seconds!
tail: cannot open ‘/var/solr/logs/solr.log’ for reading: No such file or directory
Found 1 Solr nodes:
Solr process 19067 from /var/solr/solr-8983.pid not found.
Service solr installed.
You may try the following:…
You may try the following:
-
Check if port 8983 is used by other service:
nmap -p 8983 localhostIf the port 8983 is in use, change it.
-
Add the /var/solr/logs/solr.log maually:
mkdir -p /var/solr/logs
touch /var/solr/logs/solr.log
Anonymous (not verified)
Thu, 12/03/2015 - 08:34
In reply to You may try the following:… by arpeggio
nmap gives:…
nmap gives:
PORT STATE SERVICE
8983/tcp closed unknown
selinux is disabled ... firewalld is disabled ...
Please try to change your…
Please try to change your solr's port number. Make sure the port that you will assign is not used by other services.
Change Of port
How we can change the port?
To change port
Open and edit:
vi /opt/solr/server/solr/solr.xml
... search the following line in this config file:
<int name="hostPort">${jetty.port:8983}</int>
Then open and edit:
vi /var/solr/data/solr.xml
... search the following line in this config file:
<int name="hostPort">${jetty.port:8983}</int>
Also, open and edit:
vi /var/solr/solr.in.sh
... search the following line in this config file:
SOLR_PORT=8983
Restart your solr service.
Thanks Bro
Men this tutorial save me life, but i need a little more help, because when i search in my site the result are not link to the node, thanks for your time.
Search API pages
@Richard you're welcome. For simple solution, please try using Search API pages module.
Thanks again
Man thanks, the problem was the drupal 7 schema, i didn't restart the service solr, so it was using the example schema.
Thanks.
You're welcome Richard…
You're welcome Richard. Thank you also for letting us know the cause of your issue.
solr installation error
root@dindudu:/opt/solr-5.3.1# bin/solr start -e cloud -noprompt
Welcome to the SolrCloud example!
Starting up 2 Solr nodes for your example SolrCloud cluster.
Solr home directory /opt/solr-5.3.1/example/cloud/node1/solr already exists.
/opt/solr-5.3.1/example/cloud/node2 already exists.
Starting up Solr on port 8983 using command:
bin/solr start -cloud -p 8983 -s "example/cloud/node1/solr"
Waiting up to 30 seconds to see Solr running on port 8983 [-] Still not seeing Solr listening on 8983 after 30 seconds!
tail: cannot open ‘/opt/solr-5.3.1/example/cloud/node1/solr/../logs/solr.log’ for reading: No such file or directory
ERROR: Did not see Solr at http://localhost:8983/solr come online within 30
How to fix this error
Make sure the solr.log exist…
Make sure the solr.log exist, add the it maually.
Anonymous (not verified)
Fri, 02/19/2016 - 17:17
In reply to Make sure the solr.log exist… by arpeggio
NO I created the log touched…
NO I created the log touched solr.log like this if again start the solr i can't see the log file
solr-8983-console.log solr_gc_log_20160219_0413 solr_log_20160219_0415
solr_gc.log solr_gc_log_20160219_0415
arpeggio
Sun, 02/21/2016 - 00:01
In reply to NO I created the log touched… by Anonymous (not verified)
Based on your original…
Based on your original comment, you have executed:
bin/solr start -e cloud -noprompt
This Article didn't mentioned executing that command. Please follow carefully the command mentioned at "Create Solr core" section step #6. And note that this article is about guide on how to setup Apache Solr 5.x in CentOS 7 (installed in common server settings/setup).
Spot on, thanks for the…
Spot on, thanks for the instructions, glad I didnt have to use Tomcat
You're welcome.
You're welcome.
solr restart
Hi, great install example...all is working fine!
Except...any idea why solr 5 by default does not persists its cores???
What needs to be modified in order to have the cores in /var/solr/data persistent?
installed on ubuntu 14 + solr 5 + tomcat 6
many thanks already!
Solr core
Thank you!
After following the steps above under "Create Solr core" the core should be persistent. Even how many system reboot/restart made in my server running CentOS 7 (of course Solr server also restarts in this event) all the Solr cores I created are still in tact.
Btw, Solr 5 doesn't need Toomcat anymore.
You're welcome!
Hey, thank you for the…
Hey, thank you for the tutorial! Although it didn't solve my problem it was a great place to start. About those problems I want to share my findings and maybe make this tutorial even better:
- Commands cd /opt, adduser solr and chown -R solr:solr /var/solr/ are unnecessary because the script by default extracts the distribution archive into /opt, configures Solr to write files into /var/solr, and runs Solr as the solr user (unless you customize the service name, installation directories, port, and owner using options passed to the installation script).
- I wrote other findings mixed with the steps here, so I would have it for future reference. I'll leave online for a while in case you want to look at it and maybe include some points here.
- Hope it helps. Cheers.
Thanks from Fedora
Thank you for the great write up!
It still took me three tries but it turns out I was missing key bits that you had mentioned.
I'm not using Panapoly but all I had to add was search_api_solr and search_api to my Drupal install. Then for Step 4 in Create Solr Core all I had to do was
cp search_api_solr/solr-conf/5.x/* /var/solr/data/webfoobar/conf
Oh yes and 127.0.0.1 NOT localhost helped on the Drupal end!
all is working and fine…
all is working and fine!great install example
Unable to search through Attachments in Solr 5 Drupal 7
Content has been Indexed successfully and able to search in content body but search for text inside attachments yields no result.
Selected File in Fields and mentioned different file formats also. But no luck yet.
Solr 5.5.5 and Drupal 7
Thanks !
Waow super tutorial, thanks a lot !