As of this writing, Bootstrap Drupal theme only supports LESS. This tutorial will show how to create bootstrap sub-theme supporting SASS and use Grunt to manage our workflow effectively. My operating system is Windows. Therefore, the shell commands, output, etc. that will be shown here are for Windows.
Setup Bootstrap sub-theme
Copy the Bootstrap starterkit sub-theme to sites/all/themes/custom folder (we can also use sites/<website>/themes/custom). Rename the folder name to "bootstrap_mytheme" (of course you can choose different name) as well as the "bootstrap_subtheme.info.starterkit" file to "bootstrap_mytheme.info".
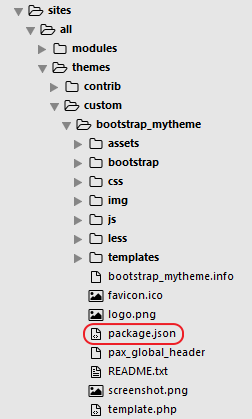
Create new folders inside our "bootstrap_mytheme" directory named bootstrap, js, img, assets, assets/images, assets/js and assets/sass. Our "bootstrap_mytheme" folder structure should now look like:
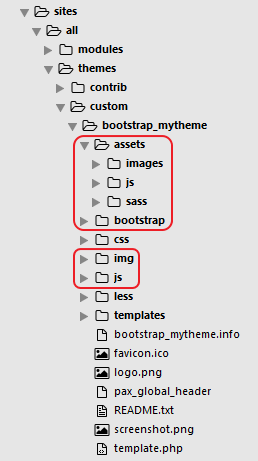
Where:
assets/images = directory of image files source of Compass generated sprite image
assets/js = custom javascript files stored in this directory
assets/sass = custom SASS files stored here
bootstrap = Bootstrap 3 source code files goes in here
img = Compass generated sprite image stored here
js = Grunt Contrib Uglify generated javascript file stored here
Download the SASS Bootstrap 3 at http://getbootstrap.com/getting-started/#download and extract it. We only need the contents of "assets" folder from the extracted bootstrap SASS source:
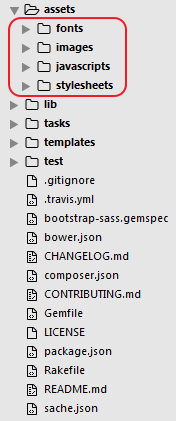
Copy these fonts, images, javascripts and stylesheets folders to our "bootstrap_mytheme/bootstrap" folder:
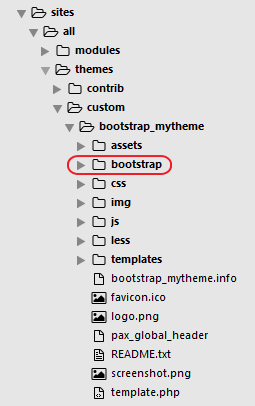
Copy the "bootstrap_mytheme/bootstrap/stylesheets/_bootstrap.scss" and "bootstrap_mytheme/bootstrap/stylesheets/bootstrap/_variables.scss" files to "bootstrap_mytheme/assets/sass/" folder.
Rename the "bootstrap_mytheme/assets/sass/_bootstrap.scss" to "bootstrap_mytheme/assets/sass/style.scss". Edit "bootstrap_mytheme/assets/sass/style.scss" file, replace all occurrences of "bootstrap/" string to "../../bootstrap/stylesheets/bootstrap/" and change the variables import from:
@import "../../bootstrap/stylesheets/bootstrap/variables";
... to:
@import "variables";
Edit the "bootstrap_mytheme.info" to match the following codes:
name = My theme
description = A Bootstrap Sub-theme.
core = 7.x
base theme = bootstrap

;;;;;;;;;;;;;;;;;;;;;
;; Regions
;;;;;;;;;;;;;;;;;;;;;
regions[navigation] = 'Navigation'
regions[header] = 'Top Bar'
regions[highlighted] = 'Highlighted'
regions[help] = 'Help'
regions[content] = 'Content'
regions[sidebar_first] = 'Primary'
regions[sidebar_second] = 'Secondary'
regions[footer] = 'Footer'
regions[page_top] = 'Page top'
regions[page_bottom] = 'Page bottom'

;;;;;;;;;;;;;;;;;;;;;
;; Stylesheets
;;;;;;;;;;;;;;;;;;;;;
stylesheets[all][] = css/style.css
; For information on choosing the desired method, please read the Drupal
; Bootstrap sub-theme "how-to" documentation:
; https://drupal.org/node/1978010

;----------------------------------
; METHOD 1: Bootstrap Source Files
;----------------------------------
;;;;;;;;;;;;;;;;;;;;;
;; Scripts
;;;;;;;;;;;;;;;;;;;;;
scripts[] = 'js/scripts.js'
;scripts[] = 'bootstrap/js/affix.js'
;scripts[] = 'bootstrap/js/alert.js'
;scripts[] = 'bootstrap/js/button.js'
;scripts[] = 'bootstrap/js/carousel.js'
;scripts[] = 'bootstrap/js/collapse.js'
;scripts[] = 'bootstrap/js/dropdown.js'
;scripts[] = 'bootstrap/js/modal.js'
;scripts[] = 'bootstrap/js/tooltip.js'
;scripts[] = 'bootstrap/js/popover.js'
;scripts[] = 'bootstrap/js/scrollspy.js'
;scripts[] = 'bootstrap/js/tab.js'
;scripts[] = 'bootstrap/js/transition.js'
; Disable BootstrapCDN if using Bootstrap source files in your sub-theme.
settings[bootstrap_cdn] = ''

; ;-------------------------
; ; METHOD 2: Bootstrap CDN
; ;-------------------------
;
; Method 2 uses BootstrapCDN, the only thing you might need to provide here
; is overrides to Bootstrap theme settings. Copy them here from the base theme
; to override.
Notice that we only have one javascript and the bootstrap javascripts should remain disabled. Later we will add those bootstrap javascripts along with our custom javascripts and compress all to one javascript file:
scripts[] = 'js/scripts.js'
Setup Workflow
We know that internet browsers don’t understand SASS and it understands regular CSS. We need to compile SASS to CSS. This is obviously extra process for us and we seek to implement workflow for this matter. There are many tools available that we can use like Prepros, Scout, etc. but we will use Grunt to manage our workflow. It is a javascript task runner that can handle many different tasks by using plugins like javascript compression, linting, compiling, etc. and it is free.
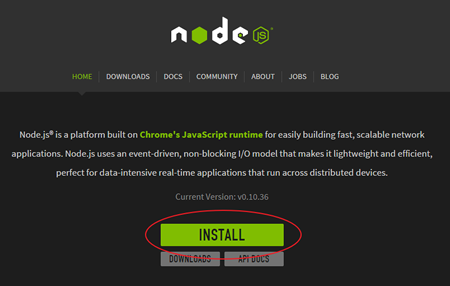
To setup automated tasks, we just need to create a javascript file with simple object and it is saved in same folder with our project. If you come back to your project many weeks later, you don’t have to do anything, we just need to run Grunt, it will read the javascript file that has been created and handle the tasks for you. Grunt requires nodejs installed in your computer in order to run. First, check if nodejs is already present in your computer by executing at your command prompt:
node -v
If you don’t see version number displayed, go to http://nodejs.org and click the "Install" button:
It will download the application that can run in your platform. After you have installed nodejs, you can now use npm. It is package manager that we will use to install Grunt plugins. Cool thing about this npm, it enables us to use "package.json" file, it is a configuration file that allows us to specify the dependencies required by our project’s workflow in order run. Let’s say your project’s workflow requires specific version of plugins in order to work and you are working in a team. Normally, you have to inform your team about the version of plugins you are using and we can see that is hassle. With npm’s "package.json" file we can list all the plugins and their version that our project needs. We can easily share this "package.json" file with our team to make sure all are in the same page when working in the project. Let's install Grunt so that it will become available in our terminal. At your command prompt, execute:
npm install -g grunt-cli
Our project’s base folder will be the bootstrap sub-theme. Inside project’s base folder, create empty text file named "package.json":
Add the following codes to this file:
{
  "name": "bootstrap_mytheme",
  "version": "0.0.1",
  "author": "Your name",
  "homepage": "http://www.webfoobar.com",
  "dependencies": {
    "grunt": "~0.4.5",
    "grunt-contrib-uglify": "v0.7.0",
    "grunt-contrib-compass": "~1.0.1",
    "grunt-contrib-watch": "~0.6.1"
  }
}
If you want to find out more about "package.json", please check https://docs.npmjs.com/files/package.json. With all the dependencies required by our project defined in "package.json", we can now install all these plugins. At your command prompt, change directory to the path of our bootstrap sub theme and execute:
npm install
This should install grunt extensions(grunt-contrib-uglify, grunt-contrib-compass and grunt-contrib-watch). SASS requires Ruby installed in our machine. To check if Ruby is already installed, execute this command on command prompt:
ruby -v
If no version number displayed, download Ruby at http://rubyinstaller.org and install it. After Ruby is installed on your computer, execute the following commands:
gem update --system
gem install compass
SASS will be installed automatically by just installing Compass. Normally, to create a project in compass we do:
compass create myproject
But here we will do differently. Create empty text file at our project’s base folder and name it "config.rb":
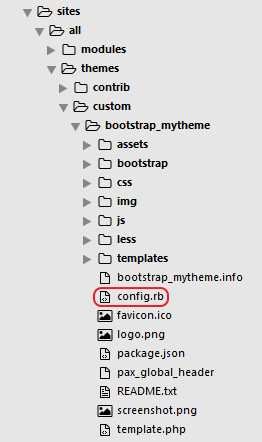
Populate our "config.rb" with these codes:
http_path = "/sites/all/themes/custom/bootstrap_mytheme"
css_dir = "css"
sass_dir = "assets/sass"
images_dir = "assets/images"
javascripts_dir = "js"
fonts_dir = "bootstrap/fonts/bootstrap"
generated_images_dir = "img"
http_images_path = http_path + "/" + generated_images_dir
http_generated_images_path = http_images_path
output_style = (environment == :production) ? :compressed : :expanded
We have this:
http_path = "/sites/all/themes/custom/bootstrap_mytheme"
... to solve this Compass generated sprite image saved in wrong directory issue.
Although the Compass document says the default value of http_generated_images_path is:
http_path + "/" + generated_images_dir
... we have to respecify that in our "config.rb" to solve this Compass set wrong path of background image in its generated CSS.
Next, we need to create "gruntfile.js" inside our project’s folder:
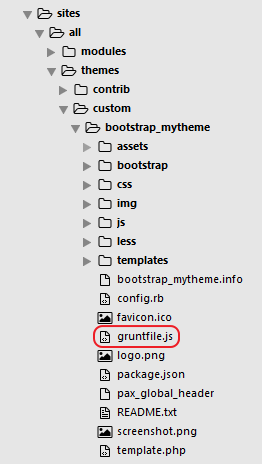
Populate our gruntfile.js with the following codes:
module.exports = function (grunt) {
  grunt.loadNpmTasks('grunt-contrib-watch');
  grunt.loadNpmTasks('grunt-contrib-compass');
  grunt.loadNpmTasks('grunt-contrib-uglify');
  grunt.initConfig({
    uglify: {
      js_dev: {
        options: {
          preserveComments: 'all',
          beautify: {
            width: 80,
            beautify: true
          } // beautify
        }, // options
        files: {
          'js/scripts.js': [
            'bootstrap/javascripts/bootstrap/affix.js',
            'bootstrap/javascripts/bootstrap/alert.js',
            'bootstrap/javascripts/bootstrap/button.js',
            'bootstrap/javascripts/bootstrap/carousel.js',
            'bootstrap/javascripts/bootstrap/collapse.js',
            'bootstrap/javascripts/bootstrap/dropdown.js',
            'bootstrap/javascripts/bootstrap/modal.js',
            'bootstrap/javascripts/bootstrap/tooltip.js',
            'bootstrap/javascripts/bootstrap/popover.js',
            'bootstrap/javascripts/bootstrap/scrollspy.js',
            'bootstrap/javascripts/bootstrap/tab.js',
            'bootstrap/javascripts/bootstrap/transition.js',
            'assets/js/*.js'
          ]
        } // files
      }, // js_dev
      js_prod: {
        files: {
          'js/scripts.js': [
            'bootstrap/javascripts/bootstrap/affix.js',
            'bootstrap/javascripts/bootstrap/alert.js',
            'bootstrap/javascripts/bootstrap/button.js',
            'bootstrap/javascripts/bootstrap/carousel.js',
            'bootstrap/javascripts/bootstrap/collapse.js',
            'bootstrap/javascripts/bootstrap/dropdown.js',
            'bootstrap/javascripts/bootstrap/modal.js',
            'bootstrap/javascripts/bootstrap/tooltip.js',
            'bootstrap/javascripts/bootstrap/popover.js',
            'bootstrap/javascripts/bootstrap/scrollspy.js',
            'bootstrap/javascripts/bootstrap/tab.js',
            'bootstrap/javascripts/bootstrap/transition.js',
            'assets/js/*.js'
          ]
        } // files
      } // js_prod
    }, // uglify
    compass: {
      prod: {
        options: {
          config: 'config.rb',
          environment: 'production'
        } // options
      }, // prod
      dev: {
        options: {
          config: 'config.rb'
        } // options
      } // dev
    }, // compass
    watch: {
      sass: {
        files: [
          'assets/sass/*.scss'
        ],
        tasks: ['compass:dev']
      }, // sass
      javascripts: {
        files: ['assets/js/*.js'], // We only need to watch the custom js
        tasks: ['uglify:js_dev']
      } // javascripts
    } // watch
  }); // initConfig
  grunt.registerTask('default', 'watch');
  grunt.registerTask('prod', ['uglify:js_prod', 'compass:prod']);
} // exports
Now that are workflow setup is completed, lets execute our tasks automation script. At your command prompt, execute:
grunt
This should execute the default task set in our gruntfile.js which is the "watch". This default task monitors the changes in our custom SASS and javascript files. If change is detected in one of your custom SASS file, Grunt will compile your SASS codes to regular CSS and save to "bootstrap_mytheme/css/style.css". If change is detected in your javascript file, Grunt will combine all the bootstrap javascript codes and your custom javascript codes into one file "bootstrap_mytheme/js/scripts.js" (it is set to not compress for debugging purposes during development mode).
For production use, execute:
grunt prod
This should compile your SASS codes with compression into regular CSS and combine the javascript codes into one file with compression.
Linux script
You may want to check sobi3ch's helper script in Linux for the Drupal Bootstrap SASS steps.
Imagemin
This is a Grunt plugin that can optimize image files (png, jpeg and gif) that will improve page load. Follow carefully the imagemin installation.
To integrate imagemin in this project, open "gruntfile.js" and replace the codes inside it with these codes:
var pngquant = require('imagemin-pngquant');
var mozjpeg = require('imagemin-mozjpeg');
var gifsicle = require('imagemin-gifsicle');
module.exports = function (grunt) {
  grunt.loadNpmTasks('grunt-contrib-watch');
  grunt.loadNpmTasks('grunt-contrib-compass');
  grunt.loadNpmTasks('grunt-contrib-uglify');
  grunt.loadNpmTasks('grunt-contrib-imagemin');
  grunt.initConfig({
    uglify: {
      js_dev: {
        options: {
          preserveComments: 'all',
          beautify: {
            width: 80,
            beautify: true
          } // beautify
        }, // options
        files: {
          'js/scripts.js': [
            'bootstrap/javascripts/bootstrap/affix.js',
            'bootstrap/javascripts/bootstrap/alert.js',
            'bootstrap/javascripts/bootstrap/button.js',
            'bootstrap/javascripts/bootstrap/carousel.js',
            'bootstrap/javascripts/bootstrap/collapse.js',
            'bootstrap/javascripts/bootstrap/dropdown.js',
            'bootstrap/javascripts/bootstrap/modal.js',
            'bootstrap/javascripts/bootstrap/tooltip.js',
            'bootstrap/javascripts/bootstrap/popover.js',
            'bootstrap/javascripts/bootstrap/scrollspy.js',
            'bootstrap/javascripts/bootstrap/tab.js',
            'bootstrap/javascripts/bootstrap/transition.js',
            'assets/js/*.js'
          ]
        } // files
      }, // js_dev
      js_prod: {
        files: {
          'js/scripts.js': [
            'bootstrap/javascripts/bootstrap/affix.js',
            'bootstrap/javascripts/bootstrap/alert.js',
            'bootstrap/javascripts/bootstrap/button.js',
            'bootstrap/javascripts/bootstrap/carousel.js',
            'bootstrap/javascripts/bootstrap/collapse.js',
            'bootstrap/javascripts/bootstrap/dropdown.js',
            'bootstrap/javascripts/bootstrap/modal.js',
            'bootstrap/javascripts/bootstrap/tooltip.js',
            'bootstrap/javascripts/bootstrap/popover.js',
            'bootstrap/javascripts/bootstrap/scrollspy.js',
            'bootstrap/javascripts/bootstrap/tab.js',
            'bootstrap/javascripts/bootstrap/transition.js',
            'assets/js/*.js'
          ]
        } // files
      } // js_prod
    }, // uglify
    compass: {
      prod: {
        options: {
          config: 'config.rb',
          environment: 'production'
        } // options
      }, // prod
      dev: {
        options: {
          config: 'config.rb'
        } // options
      } // dev
    }, // compass
    imagemin:{
      target: {
        options: {
          use: [pngquant(), mozjpeg(), gifsicle()]
        }, // options
        files: [{
          expand: true,
          cwd: 'assets/images/nonsprite/',
          src: ['**/*.{png,jpg,jpeg,gif}'],
          dest: 'img/'
        }] // files
      } // target
    }, // imagemin
    watch: {
      sass: {
      files: [
        'assets/sass/*.scss'
      ],
      tasks: ['compass:dev']
      }, // sass
      javascripts: {
        files: ['assets/js/*.js'], // We only need to watch the custom js
        tasks: ['uglify:js_dev']
      }, // javascripts
      imageopti: {
        files: ['assets/images/nonsprite/*.*'],
        tasks: ['imagemin']
      } // imageopti
    } // watch
  }); // initConfig
  grunt.registerTask('default', 'watch');
  grunt.registerTask('prod', ['uglify:js_prod', 'compass:prod', 'imagemin']);
} // exports
The additional codes will optimize the all image files (png, jpeg and gif) inside "assets/images/nonsprite" folder and save them to "img" folder.
Comments
Fluoksetyna
Hello, i think that i saw you visited my site so i came to “return the favor”.I'm attempting to find things to improve my site!I suppose its ok to use a few of your ideas!!
Forget about js/scripts.js
Very nice tutorial! I didn't believe I'll be able to finish it without erros on first approach. But I found it Drupal throw me PHP Warning when it want to access /js/scripts.js file. You forget mention you should run at least once $ grunt uglify ($ grunt -h will show you all available tasks you can run) or comment out scripts[] = 'js/scripts.js' in your .info file.
We have "grunt prod"
Thank you. Yes, I did mentioned. The following command will also execute the uglify:
grunt prod
... as we have prod in our grunt script:
grunt.registerTask('prod', ['uglify:js_prod', 'compass:prod']);
We need the scripts[] = 'js/scripts.js' in our .info file because Drupal won't know it exist if we don't define it.
ok
Ah ok, I didn't get to production yet, still developing ;)
thanks for quick reply!
github script project
I've created helper script for this
https://github.com/sobi3ch/drupal-bootstrap-sass
Thank you for sharing your…
Thank you for sharing your helper script.
Issue with grunt watch
SCSS compiles but resulting CSS-file incomplete. Please read more on https://github.com/Compass/compass/issues/1988
grunt-contrib-compass v1.0.1
That is weird. I have just tried to execute the default grunt script then change my style.scss:
$ grunt
Running "watch" task
Waiting...
>> File "assets\sass\style.scss" changed.
Running "compass:dev" (compass) task
unchanged img/sprite-sd3863fc95f.png
    write c:/xampp/htdocs/sites/all/themes/custom/bootstrap_mytheme/css/style.css (11.305s)

Done, without errors.
Completed in 32.901s at Thu Jun 25 2015 12:14:53 GMT+0800 (Malay Peninsula Standard Time) - Waiting...
The compile result shows no error.
Btw, we have "default" in our grunt script:
grunt.registerTask('default', 'watch');
... and I'm using grunt-contrib-compass v1.0.1
Thank You!
This was extremely helpful. Thank you very much. I tried setting this up before and really struggled. This is the best step-by-step instructions that I have come across!
You're welcome, glad it…
You're welcome, glad it helps you guys.
.info file
Copy the Bootstrap starterkit sub-theme to sites/all/themes/custom folder (we can also use sites//themes/custom). Rename the folder name to "bootstrap_mytheme" (of course you can choose different name) as well as the "bootstrap_subtheme.info.starterkit" file to "bootstrap_mytheme.info".
for the instruction above, how do i get the .info file? im using mac osx currently. Does this apply for windows platform only?
im suing
bootstrap_subtheme.info.starterkit
When you downloaded the Drupal bootstrap theme here https://www.drupal.org/project/bootstrap and unzip it, there should be a file named "bootstrap_subtheme.info.starterkit" inside the folder "bootstrap". That file should be your ".info" file for you subtheme.
sobi3ch have successfully tried the instructions above in different platform (Ubuntu Linux). And he created a script to simplify the steps and can be found here https://github.com/sobi3ch/drupal-bootstrap-sass. So the instructions above should work in other platform.
Thanks
Thankyou very much for this tutorial.
Although I didn't use grunt, I managed to get compass working great! Hopefully the next version of bootstrap theme will come with sass out of the box!
You're welcome…
You're welcome.
I'm glad this tutorial helps. If you have time, try also to use grunt. It will help your work faster.
Thanks a lot!
Simply the best tutorial of creating bootstrap sub-theme on windows pc!