This is an update of this article. I have received the follwing email from Let's Encrypt:
Hi,

According to our records, the software client you're using to get Let's
Encrypt TLS/SSL certificates issued or renewed at least one HTTPS certificate
in the past two weeks using the ACMEv1 protocol. Here are the details of one
recent ACMEv1 request from each of your account(s):

Client IP address:  2400:8901::f03c:91ff:fedb:1d64

User agent:  CertbotACMEClient/1.2.0 (letsencrypt-auto; CentOS Linux 7 (Core)) Authenticator/webroot Installer/None (certonly; flags: frn) Py/2.7.5

Hostname(s):  "webfoobar.com","www.webfoobar.com","test7.webfoobar.com","test8.webfoobar.com"

Request time:  2020-02-29 16:01:06 UTC

Beginning June 1, 2020, we will stop allowing new domains to validate using
the ACMEv1 protocol. You should upgrade to an ACMEv2 compatible client before
then, or certificate issuance will fail. For most people, simply upgrading to
the latest version of your existing client will suffice. You can view the
client list at: https://letsencrypt.org/docs/client-options/

If you're unsure how your certificate is managed, get in touch with the
person who installed the certificate for you. If you don't know who to
contact, please view the help section in our community forum at
https://community.letsencrypt.org/c/help and use the search bar to check if
there's an existing solution for your question. If there isn't, please create
a new topic and fill out the help template.

ACMEv1 API deprecation details can be found in our community forum:
https://community.letsencrypt.org/t/end-of-life-plan-for-acmev1

As a reminder: In the future, Let's Encrypt will be performing multiple
domain validation requests for each domain name when you issue a certificate.
While you're working on migrating to ACMEv2, please check that your system
configuration will not block validation requests made by new Let's Encrypt IP
addresses, or block multiple matching requests. Per our FAQ
(https://letsencrypt.org/docs/faq/), we don't publish a list of IP addresses
we use to validate, and this list may change at any time.

To receive more frequent updates, subscribe to our API Announcements:
https://community.letsencrypt.org/t/about-the-api-announcements-category

Thank you for joining us on our mission to create a more secure and privacy-
respecting Web!

All the best,

Let's Encrypt
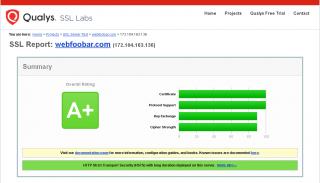
And Qualys SSL Labs made some changes in giving rate to SSL sites since I wrote this article (following it Qualys SSL Labs test only gives "B" overall rating). The following are the steps in upgrading to ACMEv2 compatible client and achieve "A+" overall rating in Qualys SSL Labs test (Note: The following procedures are tested on Linode server running Centos 7 64-bit Linux distribution):
-
Certbot is the ACMEv2 compatible client we will use. Install Certbot by executing the following commands:
yum -y install yum-utils yum-config-manager --enable rhui-REGION-rhel-server-extras rhui-REGION-rhel-server-optional sudo yum install certbot -
Let's Encrypt client validates ownership of your domain by creating a temporary file (a token) in
[webroot-path]/.well-known/acme-challenge/. We will use/var/www/letsencryptas our [webroot-path]. Let's create it and set permission:mkdir -p /var/www/letsencrypt chown nginx. /var/www/letsencryptNote: 'nginx' is a user set in nginx.conf. If this is not the case in your setup, please change it to user set in your nginx.conf file.
-
The Let's Encrypt client sends an HTTP request to validate the temporary file created in
/var/www/letsencrypt/.well-known/acme-challenge/which serves as verification that your domain's DNS record resolves to the server running it. Skip this step if you came from and followed this article. To allow the HTTP request to access the temporary file, add the following nginx script snippet:location ^~ /.well-known/acme-challenge/ { allow all; root /var/www/letsencrypt; default_type "text/plain"; try_files $uri =404; }... in your virtual servers. Example, applying it in 'yourwebsite.com' and 'yourotherwebsite.com' virtual servers nginx script:
...
server {
  listen XXX.XXX.XXX.XXX:80; ## IPv4
  listen [XXXX:XXXX::XXXX:XXXX:XXXX:XXXX]:80; ## IPv6
  server_name yourwebsite.com www.yourwebsite.com;
  ...
  location ^~ /.well-known/acme-challenge/ {
    allow all;
    root /var/www/letsencrypt;
    default_type "text/plain";
    try_files $uri =404;
  }
  ...
}
...
server {
  listen XXX.XXX.XXX.XXX:80; ## IPv4
  listen [XXXX:XXXX::XXXX:XXXX:XXXX:XXXX]:80; ## IPv6
  server_name yourotherwebsite.com www.yourotherwebsite.com;
  ...
  location ^~ /.well-known/acme-challenge/ {
    allow all;
    root /var/www/letsencrypt;
    default_type "text/plain";
    try_files $uri =404;
  }
  ...
}
...
Note: The
XXX.XXX.XXX.XXXis your server's IPv4 address andXXXX:XXXX::XXXX:XXXX:XXXX:XXXXis your server's IPv6 address.Restart Nginx:
systemctl restart nginx -
We can now request the certificate by executing:
sudo certbot certonly --webroot -w /var/www/letsencrypt --agree-tos -m [email protected] -d yourwebsite.com,www.yourwebsite.com,yourotherwebsite.com,www.yourotherwebsite.comNote: the "[email protected]" is your email address and "yourwebsite.com,www.yourwebsite.com,yourotherwebsite.com,www.yourotherwebsite.com" are your domain(s). If successful, we should see message something like this at the end:
IMPORTANT NOTES:
 - Congratulations! Your certificate and chain have been saved at:
   /etc/letsencrypt/live/yourwebsite.com/fullchain.pem
   Your key file has been saved at:
   /etc/letsencrypt/live/yourwebsite.com/privkey.pem
   Your cert will expire on 2020-07-01. To obtain a new or tweaked
   version of this certificate in the future, simply run certbot
   again. To non-interactively renew *all* of your certificates, run
   "certbot renew"
 - If you like Certbot, please consider supporting our work by:

   Donating to ISRG / Let's Encrypt:   https://letsencrypt.org/donate
   Donating to EFF:                    https://eff.org/donate-le
Note: the path name
/etc/letsencrypt/live/yourwebsite.comgenerated by the Let's Encrypt client is based on the first domain name listed in '-d' parameter in our command we executed above. In our case, it is 'yourwebsite.com' and the certificate files generated inside/etc/letsencrypt/live/yourwebsite.comare already for 'yourwebsite.com', 'www.yourwebsite.com', 'yourotherwebsite.com' and 'www.yourotherwebsite.com' domains. -
Integrate the Let's Encrypt generated certificate with Nginx. Skip this step if you came from and followed this article. Open your
/etc/nginx/nginx.confand add the following nginx script snippet inside the 'http' context:## Timeout for keep-alive connections. ## Server will close connections after this time. keepalive_timeout 75 75; ## Use a SSL/TLS cache for SSL session resume. This needs to be ## here (in this context, for session resumption to work. See this ## thread on the Nginx mailing list: ## http://nginx.org/pipermail/nginx/2010-November/023736.html. ## 1MB store about 4000 sessions: ## In this case, it store about 80000 sessions in 1 day ssl_session_cache shared:SSL:20m; ssl_session_timeout 1d; ## The server dictates the choice of cipher suites. ssl_prefer_server_ciphers on; ## Enable HSTS add_header Strict-Transport-Security "max-age=31536000"; ## Use only Perfect Forward Secrecy Ciphers. ## No SSLv3 support (SSLv3 POODLE Vulnerability) ssl_protocols TLSv1.2; ## Old Mozilla SSL Configuration ## https://mozilla.github.io/server-side-tls/ssl-config-generator/?server=nginx-1.10.2&openssl=1.0.1e&hsts=no&profile=old ssl_ciphers 'ECDHE-ECDSA-CHACHA20-POLY1305:ECDHE-RSA-CHACHA20-POLY1305:ECDHE-RSA-AES128-GCM-SHA256:ECDHE-ECDSA-AES128-GCM-SHA256:ECDHE-RSA-AES256-GCM-SHA384:ECDHE-ECDSA-AES256-GCM-SHA384:DHE-RSA-AES128-GCM-SHA256:DHE-DSS-AES128-GCM-SHA256:kEDH+AESGCM:ECDHE-RSA-AES128-SHA256:ECDHE-ECDSA-AES128-SHA256:ECDHE-RSA-AES128-SHA:ECDHE-ECDSA-AES128-SHA:ECDHE-RSA-AES256-SHA384:ECDHE-ECDSA-AES256-SHA384:ECDHE-RSA-AES256-SHA:ECDHE-ECDSA-AES256-SHA:DHE-RSA-AES128-SHA256:DHE-RSA-AES128-SHA:DHE-DSS-AES128-SHA256:DHE-RSA-AES256-SHA256:DHE-DSS-AES256-SHA:DHE-RSA-AES256-SHA:ECDHE-RSA-DES-CBC3-SHA:ECDHE-ECDSA-DES-CBC3-SHA:EDH-RSA-DES-CBC3-SHA:AES128-GCM-SHA256:AES256-GCM-SHA384:AES128-SHA256:AES256-SHA256:AES128-SHA:AES256-SHA:AES:DES-CBC3-SHA:HIGH:SEED:!aNULL:!eNULL:!EXPORT:!DES:!RC4:!MD5:!PSK:!RSAPSK:!aDH:!aECDH:!EDH-DSS-DES-CBC3-SHA:!KRB5-DES-CBC3-SHA:!SRP'; ## Pregenerated Diffie-Hellman parameters 2048. ssl_dhparam key/dh_param.pem; ## Curve to use for ECDH. ssl_ecdh_curve prime256v1; ## Enable OCSP stapling. A better way to revocate server certificates. ssl_stapling on; ## Enable verification of OCSP stapling responses by the server. ssl_stapling_verify on; ## Server certificate and key (using Let's Encrypt free SSL certificate). ssl_certificate /etc/letsencrypt/live/yourwebsite.com/fullchain.pem; ssl_certificate_key /etc/letsencrypt/live/yourwebsite.com/privkey.pem; ## Verify chain of trust of OCSP response using Root CA and Intermediate certs ssl_trusted_certificate /etc/letsencrypt/live/yourwebsite.com/chain.pem; ## Use Google's DNS resolver 8.8.8.8 8.8.4.4;Note: There is a trade-off getting 100% in "Protocol Support" using this line
ssl_protocols TLSv1.2;, your visitors using older browser/client will not be able to load your site. If you are going to support visitors using older browser/client by usingssl_protocols TLSv1 TLSv1.1 TLSv1.2;, you will get "B" to overall Qualys SSL Labs test rating.Generate DH parameters file with 2048 bit long safe prime:
openssl dhparam 2048 -out /etc/nginx/key/dh_param.pemRestart Nginx:
systemctl reload nginx -
Execute
crontab -eand append this line to update the Let's Encrypt certificate automatically:0 0,12 * * * root python -c 'import random; import time; time.sleep(random.random() * 3600)' && certbot renew -q -
Test your website's SSL rating at https://www.ssllabs.com/ssltest. We should see something like this: